What is DataStax?
DataStax is a real-time data company that helps enterprises to mobilize real-time data and quickly build smart, high-scale applications to become a data-driven business. DataStax gives enterprises and developers the freedom, simplicity, and true cloud economics to deploy massive data that powers rich interactions through modern apps. DataStax and Apache Cassandra enable over 90 percent of the Fortune 100 to create transformational outcomes with data.
Built on Apache Cassandra™, DataStax Enterprise (DSE) is hardened by the largest internet apps, proven by the Fortune 100, and supports more NoSQL workloads – from Graph to Search and Analytics. Stargate APIs simplify development with Schemaless Document and supports more NoSQL workloads including Graph, Search, and Analytics. Operators can deploy cloud-native, Kubernetes-based architectures that enable microservices and extensibility.
Advantages of DSE
Zero Downtime: Built on Apache Cassandra’s active-everywhere architecture for 24×7×365 availability.
Global Scale: Put your data where you need it without compromising performance, availability, or accessibility.
Cloud-Native Data Platform: Native Kubernetes support to tame the complexity of development, operations, and deployment.
CDC for Apache Cassandra: Create real-time pipeline from DSE to downstream systems in the data ecosystem such as search, analytics, or or other Cassandra clusters.
Zero lock-In: Freedom of choice to deploy anywhere, on any platform (on-premise, cloud and K8s)
Operational Reliability: Enterprise-grade security, monitoring, and support, hardened by the Fortune 100.
Data APIs: Powerful and productive APIs for developers. Work natively with Document (JSON), REST, GraphQL and gRPC APIs.
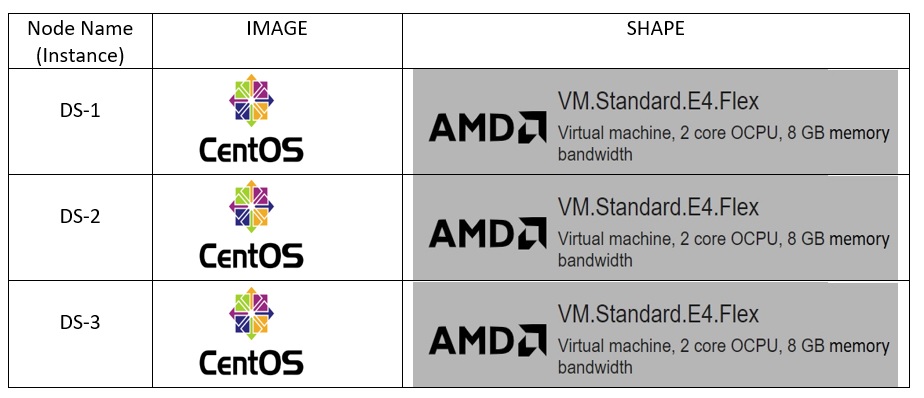
DSE on OCI
DSE is certified to run on OCI. We at Infolob have successfully implemented a 3-node DSE cluster on OCI using OpcCenter with the below specifications
DSE OpsCenter
DataStax OpsCenter is an easy-to-use visual management and monitoring solution enabling administrators, architects, and developers to quickly provision, monitor, and maintain DSE clusters which are built on Apache Cassandra.
Using OpsCenter, you can quickly upgrade, backup/restore, and manage your DSE cluster with little to no expertise.
Key Features of OpsCenter:
Automated Data Synchronization: OpsCenter provides a user-friendly view of NodeSync for easy monitoring and troubleshooting.
Full and Continuous Backups: OpsCenter backup service delivers full backup and DR protection for DSE clusters, including the ability to visually schedule the backup and restore of hundreds of nodes at a point in time, visually monitor backup and restore tasks, and clone database clusters.
Seamless Enterprise Implementation: A comprehensive set of RESTful APIs allows you to easily provision, monitor, and execute maintenance tasks using your favorite scripting language and integrate powerful functionality into your existing tools and workflows.
Simplified Upgrades: Upgrade service in OpsCenter lifecycle Manager enables you to perform patch upgrades of DSE clusters at the data center, rack, or node level with up to 60% less manual involvement.
End-To-End Performance Visibility: Performance service collects key metrics to assess the health of DSE nodes.
Comprehensive Cluster Health Management: OpsCenter Best practice service periodically scans database clusters and automatically detects and reports issues that threaten the cluster’s security, availability, or performance.
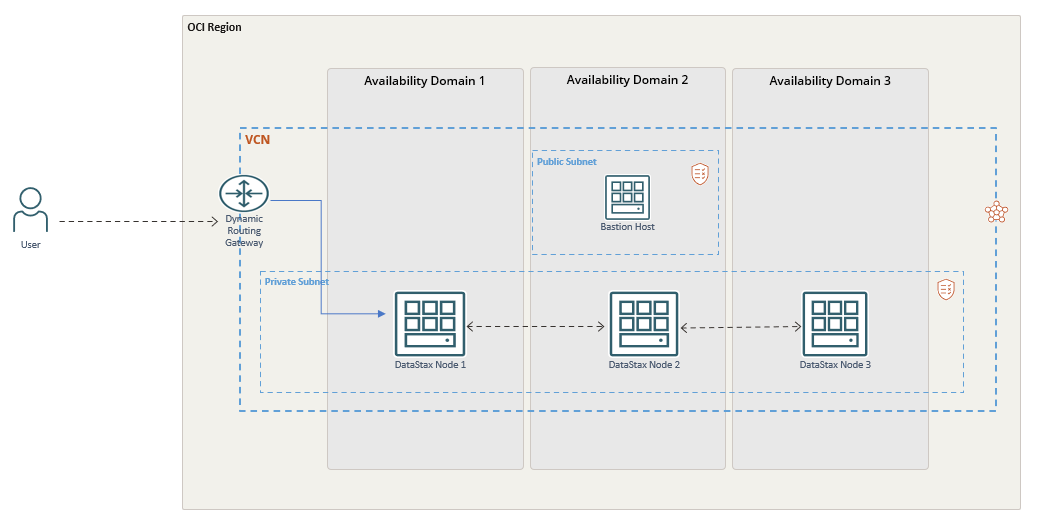
DataStax Architecture in Oracle Cloud Infrastructure (OCI):
High-level steps for DataStax implementation in OCI:
Create a compartment
Create VCN
Launch 3-node compute instances
Install DSE OpsCenter in one of the instances
Install DSE cluster using OpsCenter Console
Steps to create compute VM instance in Oracle Cloud Infrastructure:
Pre-requisites:
A compartment to launch OCI resources
A Virtual network (VCN) to launch the VM instance
SSH public and private key
Launch compute instance (CentOS 7):
In the Console, open the navigation menu. Select Compute, and then select Instances.
Click Create Instance.
Specify a name for the instance, for example, Private-Instance.
Select the compartment in which you want to place the instance.
By default, OCI selects the Oracle Linux operating system image. You don’t need to change it for this exercise.
Choose the availability domain in which you want to place the instance.
Select a shape for the virtual machine, for example, VM.Standard.E3.Flex.
On the Configure networking section, select the compartment in which your VCN resides. This is typically the same compartment in which you’re deploying this VM.
Select the VCN.
Select the compartment in which the subnet resides.
Select the private subnet.
In the Add SSH keys section, paste the ssh public key that you have already.
Click Create.
After the instance is created, the instance details page is displayed. Make a note of the private IP address.
Repeat the above steps to create 2 more compute nodes.
Installing DSE OpsCenter 6.8 from the RPM package
SSH one of the nodes by using Putty using the Public IP address of the Instance.
Add the DataStax Yum repository in the /etc/yum.repos.d/datastax.repo file.
[opscenter]
name = DataStax Repository
baseurl = https://rpm.datastax.com/enterprise
enabled = 1
gpgcheck = 0
Install the OpsCenter package:
$ sudo yum install opscenter
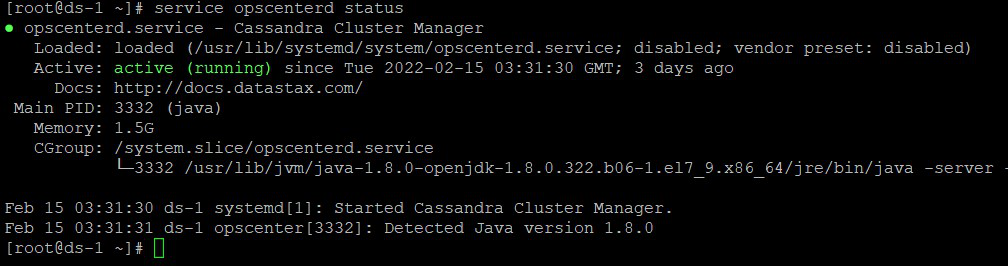
$ sudo service opscenterd start
Installing a DataStax Enterprise 6.8.7 cluster using Lifecycle Manager and DSE OpsCenter 6.8
1. Install and start OpsCenter on a separate machine using the installation method of your choice.
2. In a web browser, go to http::8888
3. After OpsCenter loads, make sure Create a new cluster is selected and click Get Started. Lifecycle Manager will load in another window.
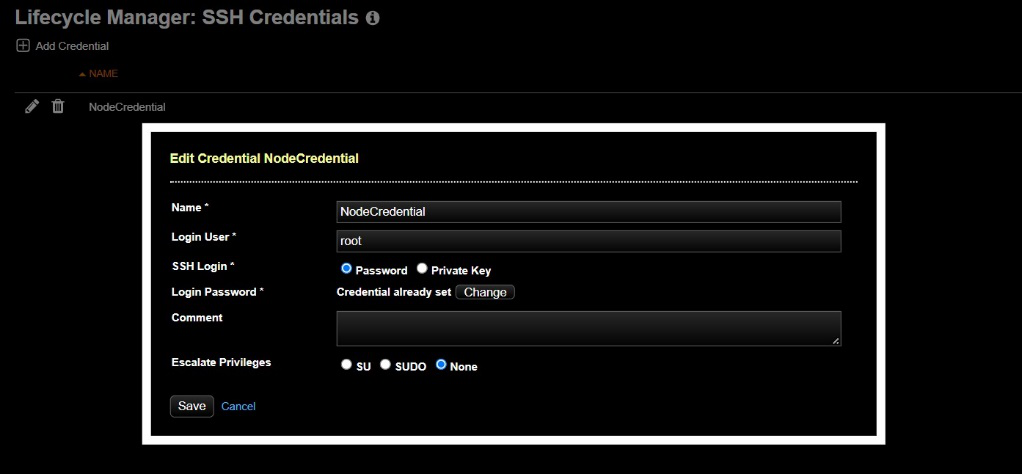
4. Click SSH Credentials in Lifecycle Manager, then click Add Credential. Give a Name to each individual user or key to keep track of the users or keys used in your cluster.
If you are using password authentication, add the user credentials for each node in the cluster under Login User and Login Password, and click Save.
If you are using a private key, enter the username under Login User, select Private Key and paste in the key, and click Save.
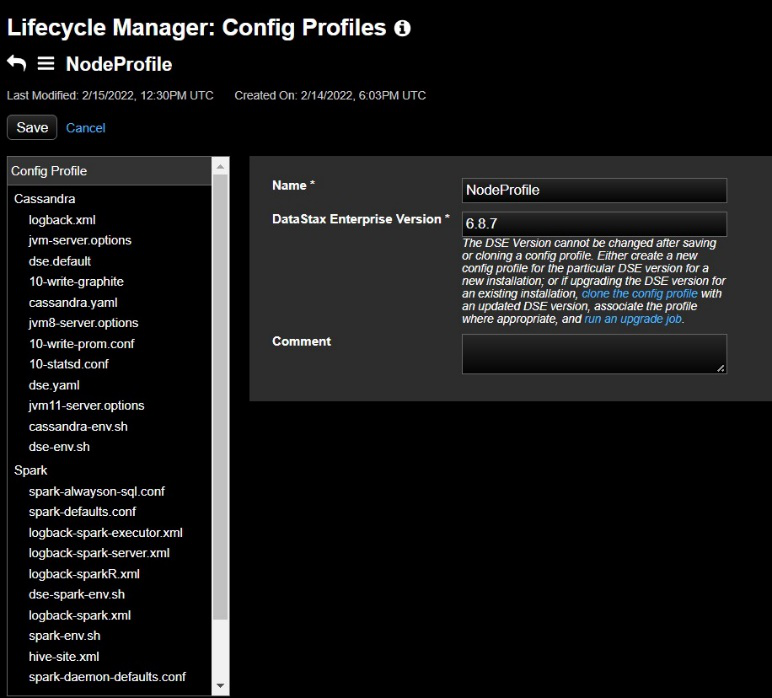
5. Click Config Profiles in Lifecycle Manager, then Add Config Profile.
Enter a Name for this configuration profile. For example, NodeProfile.
Select the version of DataStax Enterprise under DataStax Enterprise Version. For example, dse v6.8.7.
6. In Config Profiles, select cassandra.yaml in the left pane under Cassandra.
Under server_encryption_options, set internode_encryption to all. Set the keystore_password and truststore_password to new values.
Under client_encryption_options select enabled. Set the keystore_password and truststore_password to new values.
7. In Config Profiles select dse.yaml.
In the DSE Authenticator Options section under authentication_options select enabled.
In the DSE Authorizer Options section under authorizion_options, select enabled.
8. Select Save to save your named Config Profile.
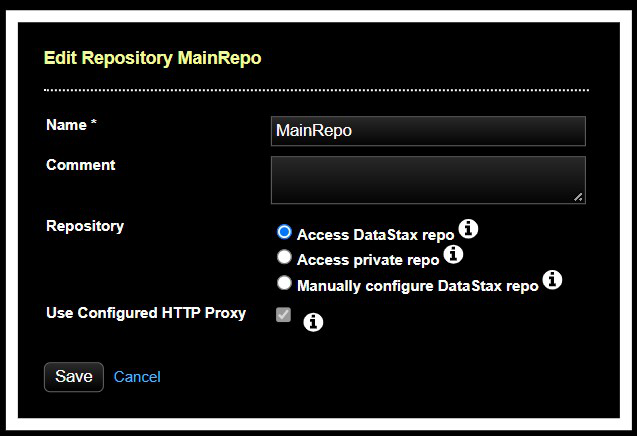
9. Click Repositories in Lifecycle Manager, then Add Repository to add a DSE repository for installing and updating DSE in your cluster.
Give a Name to this repository. For example, MainRepo.
If you are using an internal repository, click Access Private Repo and enter the repository URL and URL key.
Enter the repository credentials for your repository under Username and Password.
10. Click Clusters in Lifecycle Manager, then click Adding a Cluster. This will bring up the Add Cluster dialog.
Give a Name to the cluster. Cluster Name – TestCluster
If you use the same SSH credentials (password or key) across all the machines in your cluster, select the name of the credentials you configured under SSH Credentials.
Select the name of the configuration profile you entered under Config Profile. You are prompted to enter passwords. Enter cassandra as the Old Password for an initial install and enter a new password for the cassandra user.
Select the name of the repository you entered under Repository.
E. Click Save
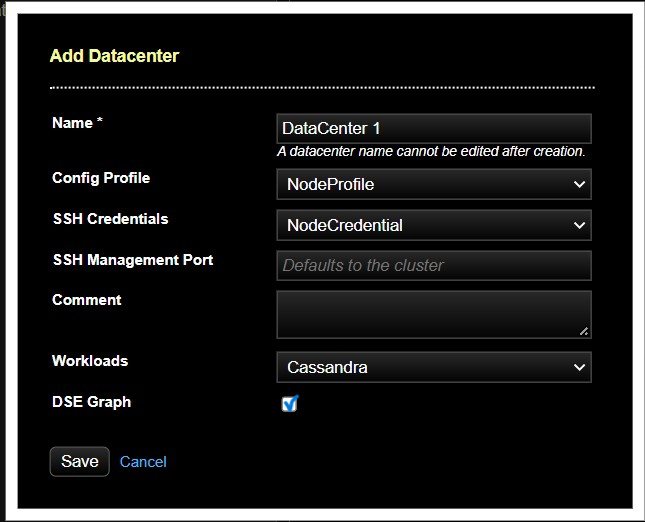
11. Click the name of the cluster you entered, then click the Add icon by Datacenters. This will bring up the Add Datacenter dialog.
Adding a Datacenter
12. Configure the transactional datacenter.
Enter the name of your datacenter under Name.
If you have different SSH credentials in each datacenter, select the name of the SSH configuration that applies to this datacenter.
Select the workload for this datacenter under Workload. For the first datacenter, leave Workload set to Cassandra to create a transactional workload.
Select DSE Graph.
Click Save.
13. Click the + icon by Datacenters to add and configure the second analytics datacenter.
Enter the name of your datacenter under Name.
If you have different SSH credentials in each datacenter, select the name of the SSH configuration that applies to this datacenter.
Select the workload for this datacenter under Workload. For the second datacenter, set Workload to Spark to create an analytics workload.
Select DSE Graph.
Click Save.
14. Add nodes to the datacenters.
a. Select the datacenter name, then click the Add icon next to Nodes.
Adding nodes to a datacenter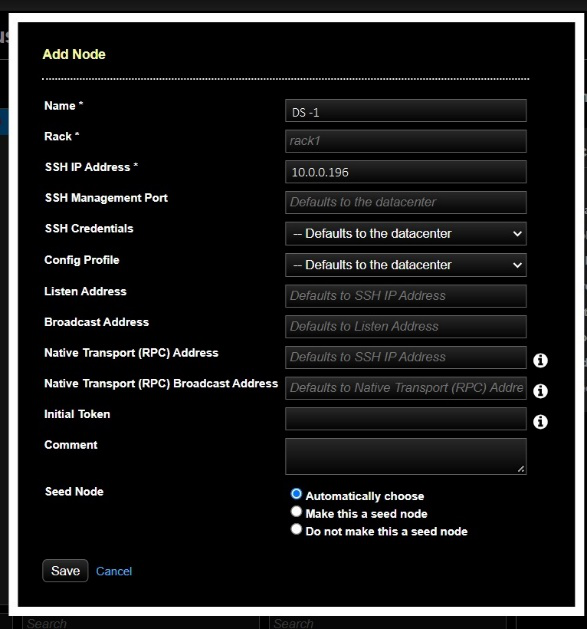
b. Enter a Name for the node. For example, DS-1.
c. Enter the IP address for the node under SSH IP Address.
d. If you have different SSH credentials for each node, select the name of the SSH configuration under SSH Credentials.
e. Enter the IP Address in Native Transport (RPC) Address if you want to override the default, which is the SSH IP Address.
f. Select Save.
g. Repeat these steps for each node in every datacenter.
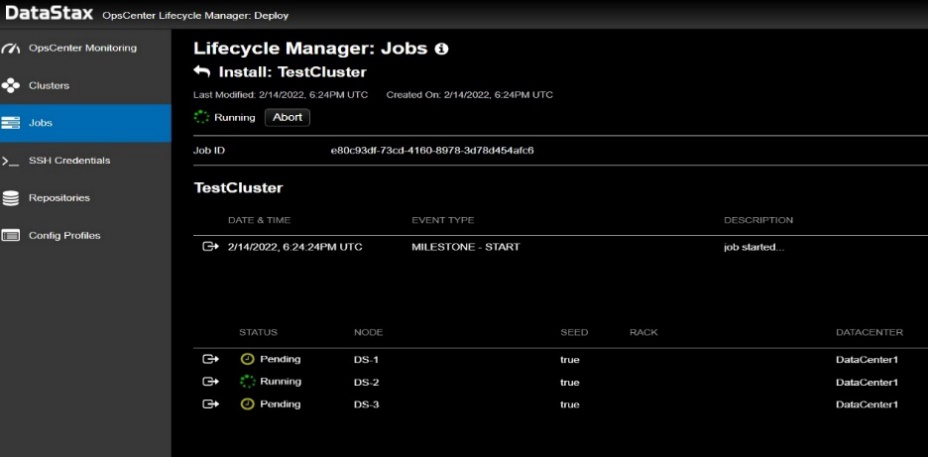
15. Select the cluster name under Clusters, then click the drop menu to the right of the cluster name.
16. Click Install to open the Run Installation Job dialog.Running the Install job.
Click Submit. The installation job has been queued by the Lifecycle Manager.
Click View Job Summary to track the progress of the installation.
Post Launching of Cluster we need to deploy DataStax Agents for OpsCenter to work properly.
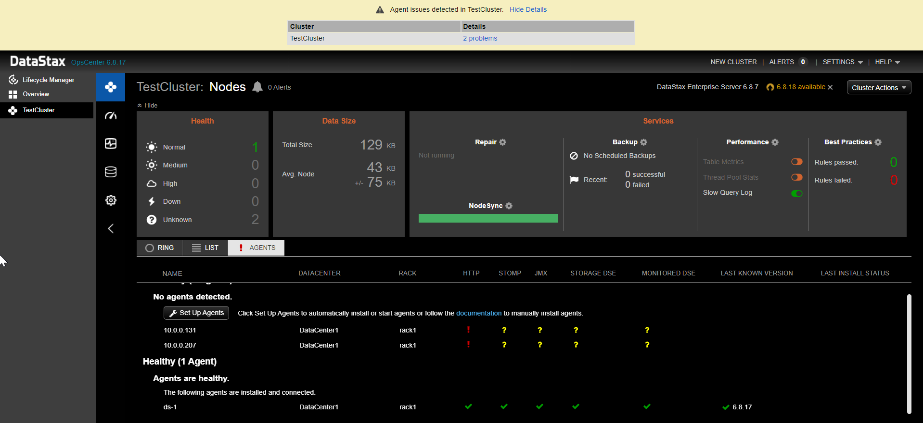
In order to work the DataStax Agents properly Few ports must be allowed in the security list.
Refer to the link below to get the list of ports to be allowed.
https://docs.datastax.com/en/opscenter/6.1/opsc/reference/opscLcmPorts.html
Check the status of the cluster from backend
$ nodetool status

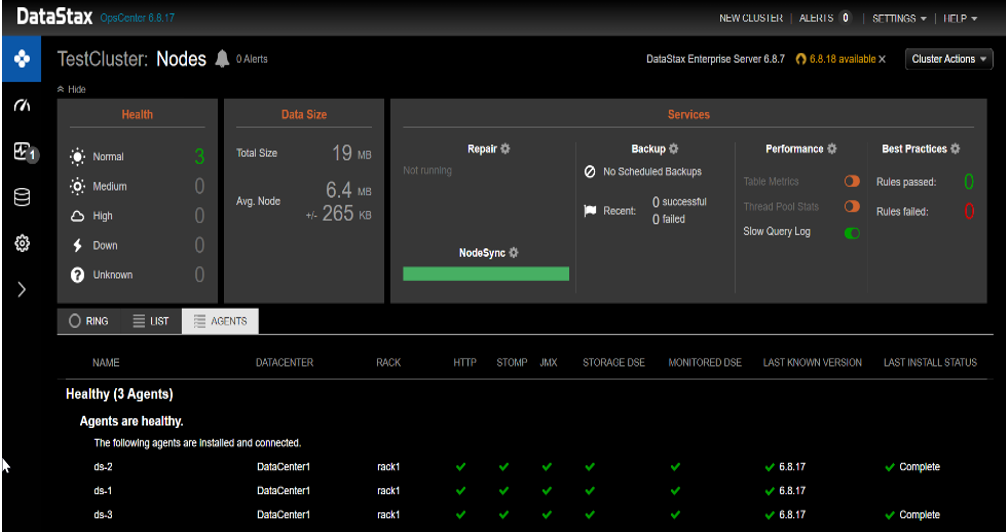
DSE OpsCenter console after implementation:
DSE and OpsCenter is also supported on Oracle Linux flavours.
Supported platforms for DSE on Oracle Linux:
DSE (v6.8,v6.7,v6.0, and v5.1) is currently supported on Oracle Linux 7 and Oracle Linux 8
Supported platforms for OpsCenter on Oracle Linux:
OpsCenter (v6.8,v6.7,v6.5, and v6.1) is currently supported on Oracle Linux 6 update 9 and Oracle Linux 7 update 6
Conclusion
From near-infinite scale, 100% availability, and multi-cloud/Kubernetes/bare-metal/open-source deployments, to effortless APIs for NoSQL such as REST, schemaless JSON, gRPC, and GraphQL for Cassandra – DataStax have you fully covered to take on data economy, bypassing all the costs and complexities of multiple OSS projects and unscalable APIs. Turbocharge ecommerce, AI/ML, microservices, IoT, mobile, social media, gaming, and affluently interactive, elastic, modern applications. Let Infolob help you with its top-notch implementation.
Write to us at [email protected]